


2014-2018 Chevy Silverado and GMC Sierra 1500; 2015-2019 2500 and 3500
Upgrading the stereo system in your Silverado or Sierra


In brief: This Crutchfield Research Garage article gives you an overview of your truck's stock stereo system and your aftermarket upgrade options. We'll tell you all about:
- The factory stereo system
- Removing the factory radio
- Removing the factory speakers
- Adding more bass
- Other options for your Silverado or Sierra
Then, use our vehicle selector to find the gear that will fit your Chevy or GMC.
Overview of the Silverado and Sierra
When there's truck stuff to be done, nothing does it like GM's Chevy Silverado and GMC Sierra. The thing is, pretty much anything is truck stuff these days, so these trucks are designed to do the job in style — whatever the job might be.
Whether you're hauling lumber to a job site, towing your boat to the lake, or hauling the kids home from soccer practice, a Silverado or Sierra is up for whatever. These big, brawny trucks are made for hard work, but they can be optioned up to near-Cadillac levels of luxury if you want it. The stock stereos vary from basic to not-bad, but if you want serious sound, you'll want to upgrade your audio system with aftermarket gear. We can help with that.
Note: This article covers the 2014-2018 1500 and 2015-2019 2500, 3500, and HD models. During 2019, the third-generation Silverado 1500 was sold alongside the new-for-2019 fourth-generation models under a new name — Chevrolet Silverado HD. This information applies to those third-gen HD models only.

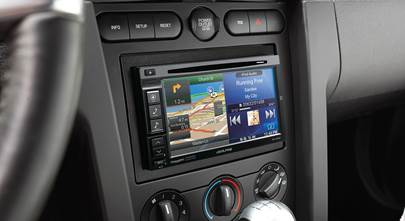
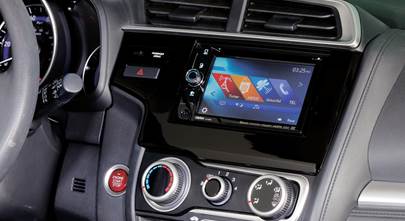
Here's a good look at the base-model 4" factory radio (Crutchfield Research Photo)
The factory stereo system
The 4.2" LCD base radio is an AM/FM radio with four speakers. The upgraded receivers, which you’re more likely to have in your truck, were 7" and 8" LCDs with ever more built-in options. All the receivers are housed in the same enter dash cluster, so the removal and replacement process is pretty much the same, too. You will need to modify the dash cavity a bit, and we’ll dive deeper into that task below.
OnStar is standard on all models, and the MyLink (Chevy) and Intellilink (GMC) touch-screen multimedia interface was available as well.
Trucks equipped with the factory Bose system offer their own challenges. When installing a new stereo, you’ll need to bypass the factory amp, which is located on the back wall of the cab, behind the rear seat on the passenger's side. You’ll also need to install an aftermarket amplifier to power the factory subwoofer.
Upper-level trucks are also equipped with an active noise cancellation system. When you add an aftermarket amp, sound processor, or subwoofer, you'll need to disable that system. We have instructions on that, and we’ll be happy to pass them along.

This dash kit (discounted with your stereo purchase) is a key element of your audio upgrade (Crutchfield Research Photo)
Removing the factory radio
Removing the factory radio isn’t all that hard, and the step-by-step details can be found in the Crutchfield MasterSheet that we’ll include free with your receiver (or speaker) purchase. There are, however, a few things you’ll need to know before you start the removal/replacement process.
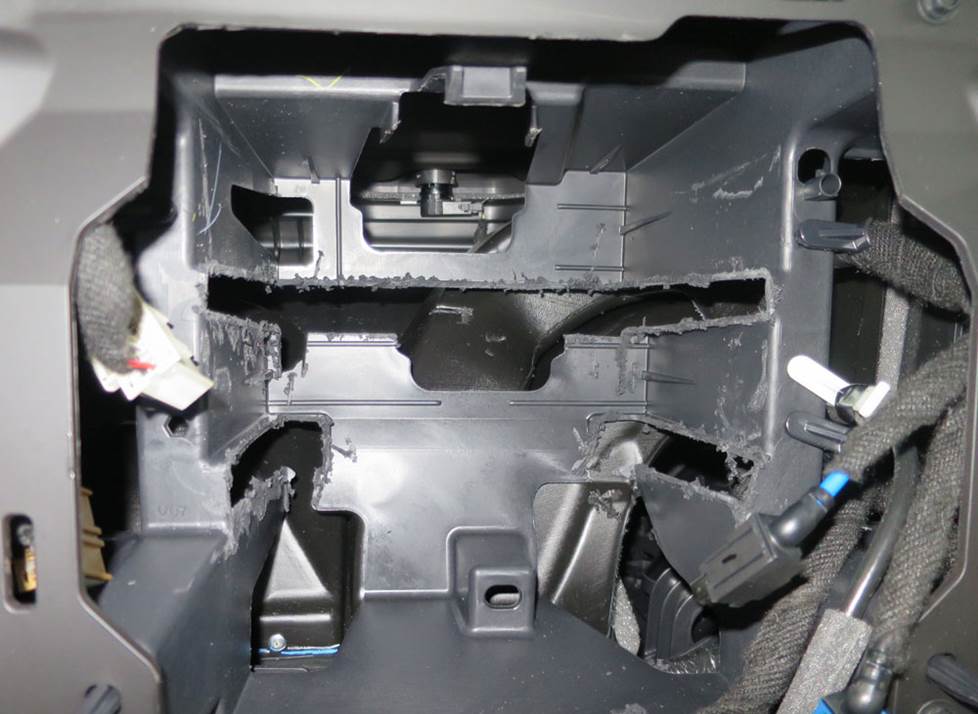
You'll have to use a hacksaw or a rotary tool to clear out the plastic rails inside the receiver cavity to install your new receiver. This isn't hard, but it is a permanent modification. (Crutchfield Research Photo)
A single-DIN (2” tall) or double-DIN (4” tall) receiver will fit in your truck, and we’ll give you a discount on the dash kit you’ll need for installation. You will have to cut out the plastic rails inside the receiver cavity to install the new receiver, though. This isn’t a hard job (a hacksaw or rotary tool will work nicely), but it is permanent and you won’t be able to reinstall the old factory receiver once it’s done. You’ll want to work carefully, watch out for wires, and wear eye protection.
You’ll also need to purchase an adapter that allows you to retain your truck’s warning chimes and OnStar® features. These adapters are not free, but we'll give you a very nice discount on the ones you'll need. Crutchfield strongly recommends that you use one of the recommended adapters, because failure to do so may result in serious injury or death, which you would like to avoid. It will most certainly result in our (very polite) refusal to provide technical assistance when you call in for installation advice.
Detailed stereo and speaker removal instructions

If your truck is equipped with OnStar, you’ll need to relocate the module when you install an aftermarket receiver. Once you’ve removed the receiver, you’ll be able to get to it easily. To do the job, keep the OnStar module wiring harnesses connected and release the clip at top of the module. Pull the module out and relocate it into the space created by the removal of the stock CD player. You won’t need (or want) to modify the module in any way, but you will want to secure it with Velcro strips or something similar.
Be sure to reconnect the OnStar Module after you relocate it, because if it isn't connected, you won't be able to start your truck.

Removing the 8" factory radio involves the same steps used for the 4" model (Crutchfield Research Photo)
Once that’s done, you’ll prepare the new receiver for installation by following the instructions included with your dash kit and wiring harness. Test the receiver to make sure it’s working properly, and if it is, start putting the dash back together by doing all the disassembly instructions in reverse. If you run into any problems, remember that your Crutchfield stereo purchase also includes free tech support for the life of your gear. Our experts are well-trained, fun to talk to, and they’re right here in our offices seven days a week.
Tools needed: Panel tool, 7mm socket, ratchet and extension
Read our Car Stereo Buying Guide for shopping tips and advice.
Shop for car stereos that fit your GMC Sierra 1500
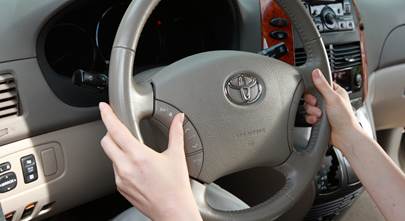
Steering wheel audio controls
In most cases, it's reasonably easy to retain your truck's steering wheel audio controls when you install a new stereo. When you enter your vehicle information, our database will choose the adapter you need to make your factory steering wheel controls work with a compatible aftermarket receiver.

Replacing the stock speakers can really boost the sound quality in your Silverado or Sierra (Crutchfield Research Photo)
Removing the factory speakers
You'll find speakers in the dash, front doors, and rear doors, assuming your Silverado or Sierra has 'em. Regular cab trucks get their rear sound from pillar speakers. The Crew Cab and Double Cab trucks also give you some cool options for adding bass.

A new set of dash speakers will dramatically improve your trucks's soundstaging (Crutchfield Research Photo)
Dash speakers
All Silverados and Sierras, regardless of system, will have 2-3/4" speakers in the dash corners. They’re pretty easy to deal with, save for the fact that there’s not a wiring harness adapter available for this location. You can splice or solder, or use a set of Posi-Products connectors to connect your new speakers to the factory wiring. You’ll also need to fabricate a bracket or use our universal backstraps to secure the new speakers in the cavity.
Starting at the top edge, pry out the driver’s side pillar trim panel to release the retaining clips. Push down on the retainer strap to release, then lift the trim panel to remove it. Next, pry open both screw covers on the passenger’s side pillar grab handle and remove one 10mm screw at each location. Lift that panel and remove it.
Pry up the grille/defroster panel to release several retaining clips, then twist the sensor assembly to release it. Remove the panel and set it aside, then remove the two 7mm screws securing the speaker. Pull it out, disconnect it, and remove it.
From here, secure the new speaker in place and make your connections. Test the speakers to make sure they're both working. If all's well, start putting things back together.
Tools needed: Panel tool, 7mm and 10mm sockets, ratchet and extension

You'll need to remove the door panels to replace the stock speakers. (Crutchfield Research Photo)
Front door speakers
The 6"x9" front door speakers are also pretty easy to deal with, and you can replace them with a healthy variety of aftermarket speakers. You’ll need to remove the door panels to do the job, but that’s a project well within the average DIY-er’s wheelhouse.
To start, insert your small, flat-blade screwdriver into the pry point and pry out the screw cover behind the door release and remove one 7mm screw. Do the same with the screw cover inside the door pull cup, then move down the door and remove the two 7mm screws along the bottom edge of the door panel.
What happens next depends on the way you lower the windows in your truck:
If you have power windows, pry out the bottom edge of the armrest trim strip to release four clips, then remove it and then remove the now-exposed 7mm screw.
If your truck is equipped with good old-fashioned manual windows, you’ll use a (clean) shop rag and work it in a "shoeshine" motion to release the C-clip in the rear of the crank until you can remove the crank.

Once you've removed the 7mm screw from the top of the speaker, you can pry it out with a panel tool (Crutchfield Research Photo)
With that out of the way, use your panel tool to pry out the sides and bottom of the door panel to release thirteen retaining clips. Disconnect the door release cable and wiring harness, then remove the door panel and store it someplace safe while you’re working.
Remove the 7mm screw from the top of the stock speaker, then pry it out, disconnect it, and set it aside. Secure your new speaker to the adapter bracket (included with your Crutchfield speaker purchase), connect the speaker wiring adapter (also included) to the factory wiring then secure the speaker. Be sure to test it out before you start putting the door back together.
Tools needed: Panel tool, small flat blade screwdriver, 7mm socket, ratchet and extension

You'll need to drill new mounting holes when you replace the pillar speakers (Crutchfield Research Photo)
Rear pillar speakers (Standard Cab)
In Standard Cab trucks, you’ll find 4"x6" speakers in the rear pillars. Removing them isn’t too difficult overall, but you will need to drill new mounting screw holes for your aftermarket speakers. This isn’t hard, but you’re drilling a hole into a truck you might still be paying off, so work carefully, pay attention to what’s around the area, and definitely wear eye protection.
There’s no wiring harness adapter for these speakers, so you’ll need to use Posi-Products speaker connectors here, too. Or you can splice or solder, if you really want to. There’s a decent amount of panel removal and various fiddly bits to this removal/replacement process, so make sure you test your new pillar speakers before you button everything up again.
Complete, illustrated instructions can be found in your Crutchfield MasterSheet, of course.
Tools needed: Panel tool, small flat blade screwdriver, 7mm socket, ratchet and extension

The Crew Cab's rear door speakers can be replaced by a nice assortment of aftermarket models (Crutchfield Research Photo)
Rear door speakers (Crew Cab)
The Crew Cab’s full-size rear doors house 6-3/4" factory speakers. They’re pretty easy to deal with, and they can be replaced by a variety of aftermarket models. You’ll need speaker mounting brackets in most cases, and we’ll include them with your Crutchfield speaker purchase. There’s no wiring harness adapter for these speakers, so you’ll need to use Posi-Products speaker connectors.
The speaker removal process here is quite similar in most ways to the work done on the front doors. We’ll spare you the repetitive step-by-step here, but it’s all included in the illustrated Crutchfield MasterSheet included free with your Silverado/Sierra speaker purchase.
Tools needed: Panel tool, small flat blade screwdriver, 7mm socket, ratchet and extension

The Double Cab's doors are smaller, but the speakers are still 6-3/4" models (Crutchfield Research Photo)
Rear door speakers (Double Cab)
In the Silverado/Sierra Double Cab (formerly known as the Extended Cab), the slightly-smaller rear doors house 6-3/4" factory speakers. They’re pretty easy to deal with, too, and a heathy number of aftermarket models will fit with the help of the speaker mounting brackets included with your Crutchfield speaker purchase. There’s no wiring harness adapter for these speakers, so you’ll need to use Posi-Products speaker connectors here, too.
The work you’ll do on these doors is also very much like the work done on your truck’s front doors. All the details are in your MasterSheet, so we’ll glide past those here. When you’re working on these (or any) doors, remember to make sure the windows, door locks, and door releases are working properly when you start putting the doors back together.
Tools needed: Panel tool, small flat blade screwdriver, 7mm socket, ratchet and extension
Read our Car Speakers Buying Guide for more information.
Shop for speakers that fit your GMC Sierra 1500

Replacing the center console subwoofer takes a bit of effort (Crutchfield Research Photo)
Bass in your Silverado or Sierra
Bose-equipped trucks feature a center console subwoofer. It’s an oblong, down-firing 6" sub with 0.9-ohm impedance and it can be replaced with some effort on your part. Once you get to the sub, which is a somewhat lengthy process, you’ll need to fabricate a bracket no larger than 5.634" x 5.853" for whatever aftermarket sub you can find to fit the space. Complete removal instructions can be found in your MasterSheet, of course.
Because this is a low-impedance sub, replacing it with a standard 4-ohm sub will result in lower volume levels unless you also install an aftermarket amplifier. In a similar vein, if you replace the factory radio and decide to keep the stock sub, you’ll also need to install an aftermarket amplifier. This seems like a good place to give you a link to our selection of mono and multi-channel amplifiers.

This JL Audio Stealthbox is designed to replace the center console sub in your Silverado or Sierra
If you’re driving a Crew Cab Silverado or Sierra with the Bose system, there’s another possible option. This JL Audio Stealthbox® enclosure installs inside the front part of the center console in 2014-2018 Silverado and Sierra Crew Cab trucks equipped with front bucket seats and factory console. It includes one down-firing 10" TW1 2-ohm subwoofer, and when combined with the right amp, it’s a pretty impressive unit. It comes with its own installation instructions, and if you have questions, our tech team is just a phone call away right here in Virginia.
Tools needed: Panel tool, 10mm socket, 1/4" socket, ratchet and extension, Torx T-15 driver

This Stealthbox enclosure installs under the rear seat in select 2014-up Chevrolet Silverado and GMC Sierra Double Cab trucks
Adding bass to your Silverado or Sierra
If your truck doesn’t have a subwoofer (Or if you just want to go really big on bass in your truck, which we totally get...), you do have some options. Well, not in Regular cab trucks, because there’s no space for an enclosure behind the seats, but definitely in the Crew Cab and Double Cab models.
In the Double Cab, there’s a 10"H x 16"W x 7"/5"D space under the left rear seat. The Crew Cab offers a 13"H x 56"W (side to side) x 7"/4"D space.
Depending on your truck, you can also opt for a custom-fit enclosure from JL Audio, Kicker, or MTX. To see what’s available for your Silverado or Sierra, just enter your vehicle information.
Learn more about building a bass system in our Car Subwoofer Buying Guide.
Shop for vehicle-specific subwoofers for your GMC Sierra 1500

Adding Dynamat to your truck's doors can quiet wind noise and roar roar
Other options for your Silverado or Sierra
Here are some other smart ideas for your Chevy Silverado or GMC Sierra.
Sound damping to block road noise
There's no way to totally eliminate wind and road noise from any truck, much less one as blocky and bluff as the Silverado/Sierra. That said, installing some Dynamat in the doors can reduce the roar and really seal in sound. A set of inexpensive foam speaker baffles behind your new speakers will also help, plus they help protect the speakers from dust and damage.
See more with a rear-view camera
These trucks are all pretty massive, so they can be a handful in tight parking spots. A rear-view camera will enhance your safety and peace of mind.
Protect your carpeting with custom-fit floor liners
Driving a Silverado or Sierra eventually leads to doing truck-type things, which can take a toll on your truck's carpeting. WeatherTech floor mats and liners will help protect your floors from dirt and damage.
Security systems and remote start
Installing a security system in your Silverado or Sierra won't be easy (security systems rarely are), but it's definitely a good idea if you tow long distances and stop overnight. Our Crutchfield Advisors can help figure out what you need to get the job done, but we usually recommend taking your truck to a professional installer.
Adding remote start capability to your Silverado or Sierra lets you warm it up in the winter or cool it down in the summer. Installation is usually easier with these systems, but we still ask that you call to order so that we can make sure you get the right harness for your ride.
Let's get started!
Ready to shop? Use our vehicle selector to find the gear that will fit your car or truck. If you have questions of your own, give us a shout via phone or email
Comments (14)
Please share your thoughts below.


brett martin from Phoenix
Posted on 2/25/2023
2019 Chevy Duromax. BOSE SYSTEM. Driver side door 6×9 is all bass and the front passenger side is completley dead. Nothing coming to that speaker. Do I replace both or is there something else I should be looking at?
Jon Paul from Crutchfield
on 2/27/2023
Jon Paul from Crutchfield
Posted on 12/20/2022
Tim, To be clear, this article only talks about the holdover third-gen trucks sold mostly for fleet use. If you're asking about the all-new-for-2019 fourth-gen trucks, the "receiver" is actually more of a display. Replacement would be incredibly complicated, so we don't recommend it.
Tim
Posted on 12/19/2022
Could you be more specific about the changes to the 2019 that would prohibit changing the head unit? Is it something that's still doable if someone is willing to lost certain features?
Dustin P. from Upton
Posted on 9/3/2021
I have a 2016 gmc 2500 with io4. I have replaced it with an Alpine X110-SRA and kenwood components that I got from you. I would like to add a mini amp hidden in the dash, and retain the factory speaker wiring. Is there a pigtail I should use?
Jon Paul from Crutchfield
on 9/6/2021
Dustin
Posted on 8/10/2021
I got a 2016 Silverado with the factory Bose system and sub. You mention the ohm impedance of the 6" sub as being 0.9......but what are the ohm impedance ratings of the front door (6x9), rear door (6.5"), and dash corners (2.5")? Asking as to determine what after market speaker replacements would work best while keeping the factory Bose amp.
Jon Paul from Crutchfield
on 8/11/2021
Doesn't matter
Posted on 8/4/2021
Any way to replace the not needed Screens "Entertainment Center" with a simple Radio/CD player set up? Only need to listen to the music. Don't want or need Navigation, rear view anything, or even Wi-Fi/Bluetooth(or what ever phone I don't have/use). Don't need or care for it, so don't want it.
Crutchfield Writing Team from Crutchfield
on 8/4/2021
Daniel thielen from CARSON CITY
Posted on 5/16/2021
Hi, When I use the Outfit My Car tool, it says there are zero stereos to choose from. Is there something wrong?
Jon Paul from Crutchfield
on 5/17/2021
Clint from Jacksonville, FL
Posted on 5/9/2021
I have a 2019 Silverado LD LT (2018 body style) - should I be shopping for gear to fit a 2018 or 2019 (with newer body style)? Also, where can I go to find a sub box that will fit under the back seat (double cab)?
Jon Paul from Crutchfield
on 5/10/2021
Brian from Byron Center
Posted on 3/7/2021
I have a 2015 sierra crew cab with 8" screen & Bose 6-speaker + 5" sub (unimpressive) in the console. Want to keep factory head unit, send appropriate power and frequencies to door and dash speakers, and replace the sub with JL audio stealthbox under the console and a dedicated 300W monoblock amp to power it. Are there products that will send factory output to the sub amp so bass will be removed from factory amp and stop the bose system from cutting back bass power as volume goes up? Would this improve stock Amp's power to the other speakers, especially mid-high frequencies?
Gage M Messenger from ASHTON
Posted on 3/4/2021
My lock settings and some other stuff is through my radio by upgrading will I lose the ability to change my lock setting and chime settings
Jon Paul from Crutchfield
on 3/4/2021